
Key Highlights
This classic lemon tart recipe is a showstopper. Here’s what makes it special:
- The recipe guides you in creating a rich and tangy lemon curd from scratch.
- You will learn to make a buttery, crisp tart crust that perfectly complements the filling.
- It includes detailed instructions on blind baking to prevent a soggy bottom. The lemon filling achieves a silky-smooth texture with a perfect balance of sweet and tart. Tips for using fresh lemon juice and zest ensure a vibrant, fresh flavor. If you’re wondering whether you can use olive oil instead of butter when making a lemon tart base, it is possible, but keep in mind that olive oil will impart a distinct flavor and affect the texture. For best results and to maintain the traditional taste, butter is typically recommended, but olive oil can be a suitable substitute for those seeking a dairy-free option or a different flavor profile.
- The lemon filling achieves a silky-smooth texture with a perfect balance of sweet and tart.
- Tips for using fresh lemon juice and zest ensure a vibrant, fresh flavor.
- Proper use of a tart pan with a removable bottom makes serving simple.
Essential Ingredients for a Classic Lemon Tart
To create this delicious lemon tart recipe, you will need a few key ingredients for both the sweet crust and the filling. For the crust, gather all-purpose flour, white sugar, salt, cold unsalted butter, and a large egg. These components come together to form a crumbly, cookie-like base. It’s important to use cold butter to achieve the right texture.
For the vibrant lemon filling, you’ll need fresh lemon juice, lemon zest, more white sugar, and large egg yolks. Some recipes might also call for heavy cream to enrich the curd. The combination of whole eggs in the crust and egg yolks in the filling creates a wonderful balance of textures. Using a 9-inch tart pan with a removable bottom will make assembling and serving your dessert much easier. Once your lemon tart has cooled completely, the best way to store it is to cover it lightly with plastic wrap or aluminum foil and refrigerate. Properly stored, a lemon tart will last up to 3 days in the refrigerator while maintaining its fresh flavor and texture.
Choosing the Right Lemons and Sweeteners
The star of any lemon tart is, of course, the lemon. The type of lemon you choose significantly impacts the final lemon flavor. Standard lemons, like Eureka or Lisbon, provide a classic, sharp tartness. For a slightly sweeter and less acidic taste, consider using Meyer lemons. Their distinct flavor can add a wonderful nuance to your dessert. No matter which you choose, always use fresh lemon juice and zest for the most vibrant and authentic taste; bottled juice simply can’t compare.
When it comes to sweeteners, white sugar is the standard for this recipe. It dissolves well and provides a clean sweetness that balances the lemon’s acidity. The amount of sugar, often around a half cup of sugar for the curd, can be adjusted slightly based on your preference for tartness. Some recipes might use powdered sugar in the crust, which can result in a more tender, melt-in-your-mouth texture compared to the crumbly texture from granulated sugar.
Achieving a crisp pastry base at home is all about technique. Using cold ingredients, not overworking the dough, and blind baking the crust are crucial steps. This process ensures your pastry is fully cooked and firm before you add the wet filling, preventing any sogginess.
The Role of Eggs and Butter in Texture and Flavor
Eggs and butter are fundamental to the texture and flavor of a classic lemon tart. In the crust, cold butter is cut into the flour to create a crumbly, tender texture. A large egg helps bind the dough together. Using cold butter is essential because it creates pockets of steam during baking, which results in a flaky, short pastry.
For the lemon curd, egg yolks are the primary thickening agent. They provide richness and create that signature silky-smooth consistency. Whisking the egg yolks with sugar and lemon juice over gentle heat allows them to cook slowly and thicken the mixture without scrambling. The butter, added at the end, gives the lemon curd a glossy finish and a rich, creamy mouthfeel. It’s best to use unsalted butter so you can control the salt content.
To ensure your lemon tart filling is smooth and not runny, constant whisking over low heat is key. This prevents the egg yolk from curdling and ensures an even cook. If the curd isn’t thickening, you can slightly increase the heat, but continue whisking vigorously. Cooling the curd completely also helps it set to the perfect consistency before you fill the tart shell.
How to Prepare the Perfect Tart Crust
Creating the perfect tart crust is the foundation of a great lemon tart. The goal is a sweet shortcrust pastry that is both sturdy and delicious. Using a food processor can make the process quick and easy, combining the flour, sugar, and cold butter into a coarse meal. Then, an egg is added to bring the dough together. If you don’t have a food processor, a pastry cutter works just as well.
Once the dough is formed, it needs to be chilled before being rolled out with a rolling pin and fitted into a tart pan. This chilling step is crucial as it prevents the tart shell from shrinking during baking. After chilling, you’ll blind bake the crust using pie weights to ensure it stays flat and bakes evenly. This method results in a crisp, golden shortcrust pastry ready for its luscious filling. While this recipe uses an egg, egg-free versions can be made using specific recipes that substitute the egg with other binders.
Crisp Pastry Dough from Scratch
Making a crisp pastry dough, or pâte sucrée, from scratch is rewarding. Start by combining all-purpose flour, sugar, and salt in a food processor. Add small cubes of very cold butter and pulse until the mixture looks like a coarse meal. This step is vital for a tender, crumbly sweet tart crust. Add an egg and pulse just until the dough starts to form clumps. Be careful not to overmix.
Turn the dough onto a lightly floured surface, form it into a disc, and wrap it in plastic wrap. Refrigerate it for at least an hour. This resting period allows the gluten to relax and the butter to firm up, making the dough easier to roll and preventing shrinkage in the tart tin. When ready, roll the dough into a circle and gently place it in your tart pan. Freeze the lined pan for about 30 minutes before baking.
For a gluten-free lemon tart crust, you can substitute the all-purpose flour with a 1:1 gluten-free baking flour blend. You might need to adjust the amount of butter if the dough seems too dry. Other key steps remain the same:
- Keep your ingredients, especially the butter, very cold.
- Chill the dough thoroughly before rolling and baking.
- Use pie weights during blind baking to ensure an even crust.
Crafting the Silky Lemon Filling
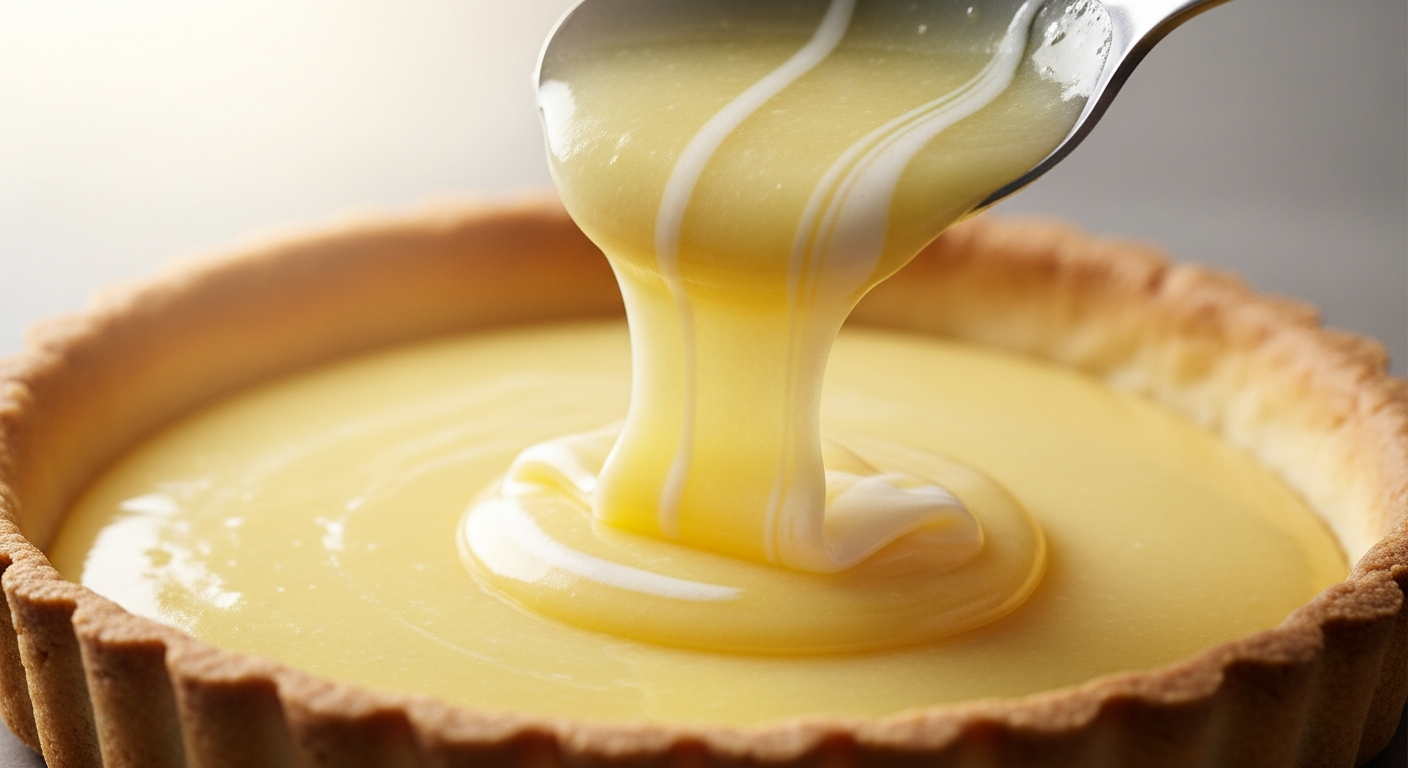
The heart of a classic lemon tart is its silky, vibrant lemon filling. This is essentially a lemon curd, a rich custard made from fresh lemon juice, sugar, and egg yolks. The key to its luxurious texture is the cooking process. You need to cook the lemon mixture gently over low heat, whisking constantly. This careful heating allows the egg yolks to thicken the filling without scrambling, resulting in a smooth consistency.
Once the lemon filling has thickened, cold butter is whisked in off the heat. This step adds richness and gives the curd a beautiful sheen. Allowing the lemon curd to cool to room temperature before pouring it into the baked sweet crust is important. This helps it set properly and prevents it from making the crust soggy. The final result is a perfect balance of tart and sweet, with a texture that melts in your mouth.
Achieving Smooth and Stable Lemon Curd
To achieve a perfectly smooth and stable lemon curd, the technique is just as important as the ingredients. Start by whisking egg yolks, sugar, salt, fresh lemon juice, and lemon zest in a heatproof bowl. Place this bowl over a saucepan of simmering water to create a double boiler. This provides gentle, indirect heat, which is crucial for preventing the eggs from curdling. Whisk the mixture constantly for about 10 minutes until it has thickened enough to coat the back of a spoon.
Once thickened, remove the bowl from the heat. Cut cold, unsalted butter into small pieces and whisk them into the hot curd one at a time until fully incorporated. The residual heat of the curd will melt the butter, creating a rich and glossy finish. Some recipes call for a small amount of heavy cream for an even richer texture, which can be added with the butter.
For an extra-smooth consistency, you can strain the finished lemon curd through a fine-mesh sieve to remove any bits of cooked egg or zest. To prevent a skin from forming on top, press a piece of plastic wrap directly onto the surface of the curd while it cools. Refrigerate for at least 2-3 hours to allow it to fully set and thicken before filling your crisp pastry base.
Common Mistakes and How to Avoid Runny Filling
One of the most common issues when making a lemon tart is a runny lemon curd filling. This is often due to undercooking the egg yolk mixture. It’s essential to cook the curd over low heat, whisking constantly, until it’s noticeably thick. Rushing this step or using too high a heat can lead to a thin filling or, worse, scrambled eggs. The perfect balance of slow cooking and constant motion is key.
Another mistake is not allowing the curd to cool and set properly. After cooking, the filling will continue to thicken as it cools to room temperature and then chills in the refrigerator. Pouring a warm filling into the tart shell and not giving it enough time to set can result in a soupy tart. Be patient and let it chill for at least four hours before serving.
Here are a few common mistakes to avoid for a perfect lemon tart:
- Overworking the pastry dough, which makes it tough instead of tender.
- Not blind baking the crust long enough, leading to a soggy bottom.
- Incorrect baking time for the filled tart, which can affect the final set of the curd.
Baking, Assembly, and Finishing Touches
Baking the tart shell properly is a critical step. This process, known as blind baking, ensures the crust is crisp and can hold the wet filling. After pressing the dough into your tart pan, you’ll line it with parchment paper and fill it with pie weights. This prevents the dough from puffing up. Bake until the edges are set, then remove the weights and paper and continue baking until the bottom is dry and golden brown. Let the tart shell cool completely on a wire rack before you proceed.
Once your crust is cool and your lemon filling is set, it’s time for assembly. Carefully pour the chilled lemon curd into the tart shell, using a small offset spatula to spread it evenly. The top of the tart should be smooth and level. For serving, use a sharp knife to get clean slices. The beauty of this dessert lies in its simplicity, but you can add creative finishing touches to elevate it. These final details will not only add flavor but also make your tart visually stunning.
Blind Baking and Assembling Your Lemon Tart
Blind baking is the secret to a crisp tart crust that won’t get soggy. To do this, preheat your oven to 375°F. Line your chilled tart shell with parchment paper or aluminum foil, making sure it fits snugly against the bottom and sides of the pan. Fill the lining with pie weights, dried beans, or uncooked rice. This weight prevents the tart crust from puffing up and the sides from slumping down during the initial bake.
Bake the crust for about 20 minutes. The parchment should no longer stick to the dough. Carefully lift out the paper and weights. Return the tart shell to the oven and bake for another 10 minutes, or until it’s dry and a beautiful golden brown. This second bake ensures the bottom of the crust is fully cooked. Let the tart pan cool completely on a wire rack before filling.
Once the tart shell is cool, you can assemble your dessert. Pour the chilled, set lemon curd into the crust and spread it evenly. Refrigerate the assembled tart for at least four hours to allow the flavors to meld and the filling to firm up completely.
| Step | Action | Purpose |
|---|---|---|
| 1. Chill | Freeze the dough-lined tart pan for 30 mins. | Prevents dough shrinkage. |
| 2. Line & Weight | Use parchment paper and pie weights. | Keeps the crust flat. |
| 3. First Bake | Bake at 375°F for 20 minutes with weights. | Sets the crust structure. |
| 4. Second Bake | Bake for 10 more minutes without weights. | Dries and browns the bottom. |
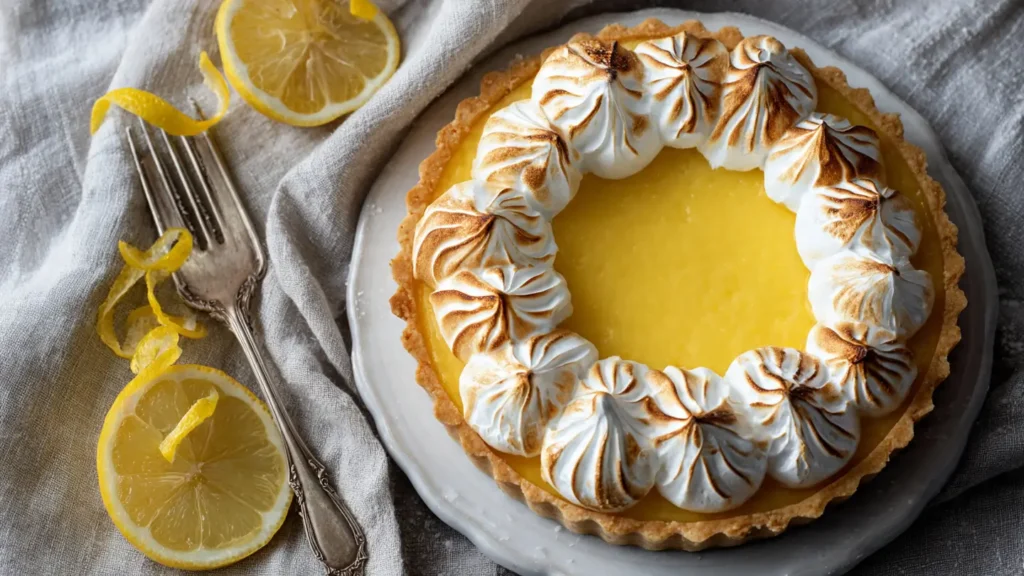
Presentation and Garnish Ideas
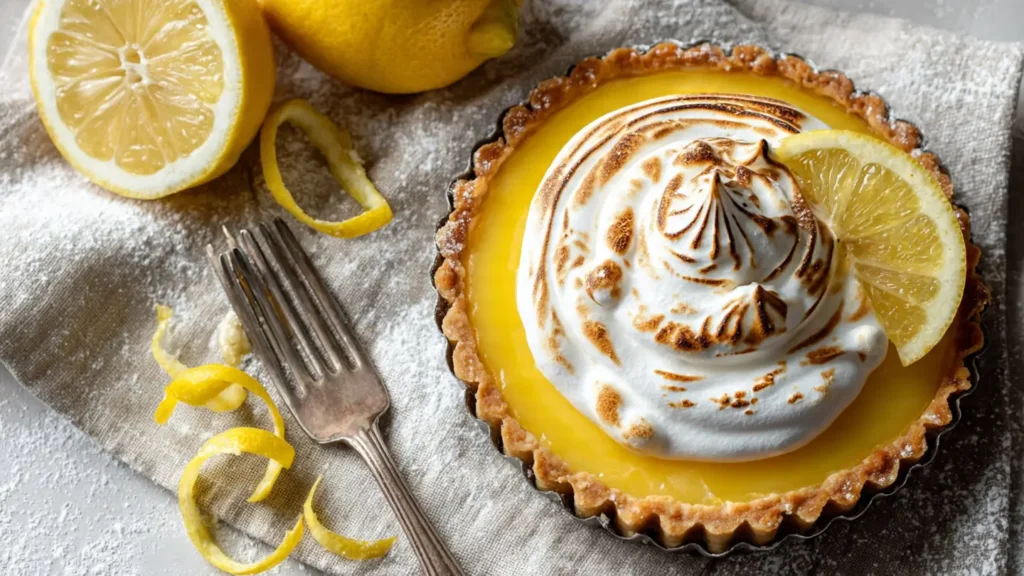
Presentation can turn a simple lemon tart into the perfect dessert. Once your tart is fully set, carefully remove it from the tart pan with the removable bottom and place it on a serving platter. The clean edges and golden crust are beautiful on their own, but a few garnishes can add a professional touch. A simple dusting of powdered sugar over the top offers a lovely contrast to the yellow filling.
For a fresh and vibrant look, consider adding fresh berries. Raspberries, blueberries, or sliced strawberries arranged in the center or around the edge add a pop of color and a complementary sweet-tart flavor. A dollop of whipped cream on each slice also provides a creamy element that balances the tartness of the lemon. Even a sprinkle of finely grated lemon zest can enhance the visual appeal and aroma.
Here are a few simple garnish ideas to elevate your lemon tart:
- A light dusting of powdered sugar for classic elegance.
- A pile of fresh berries in the center for color and flavor.
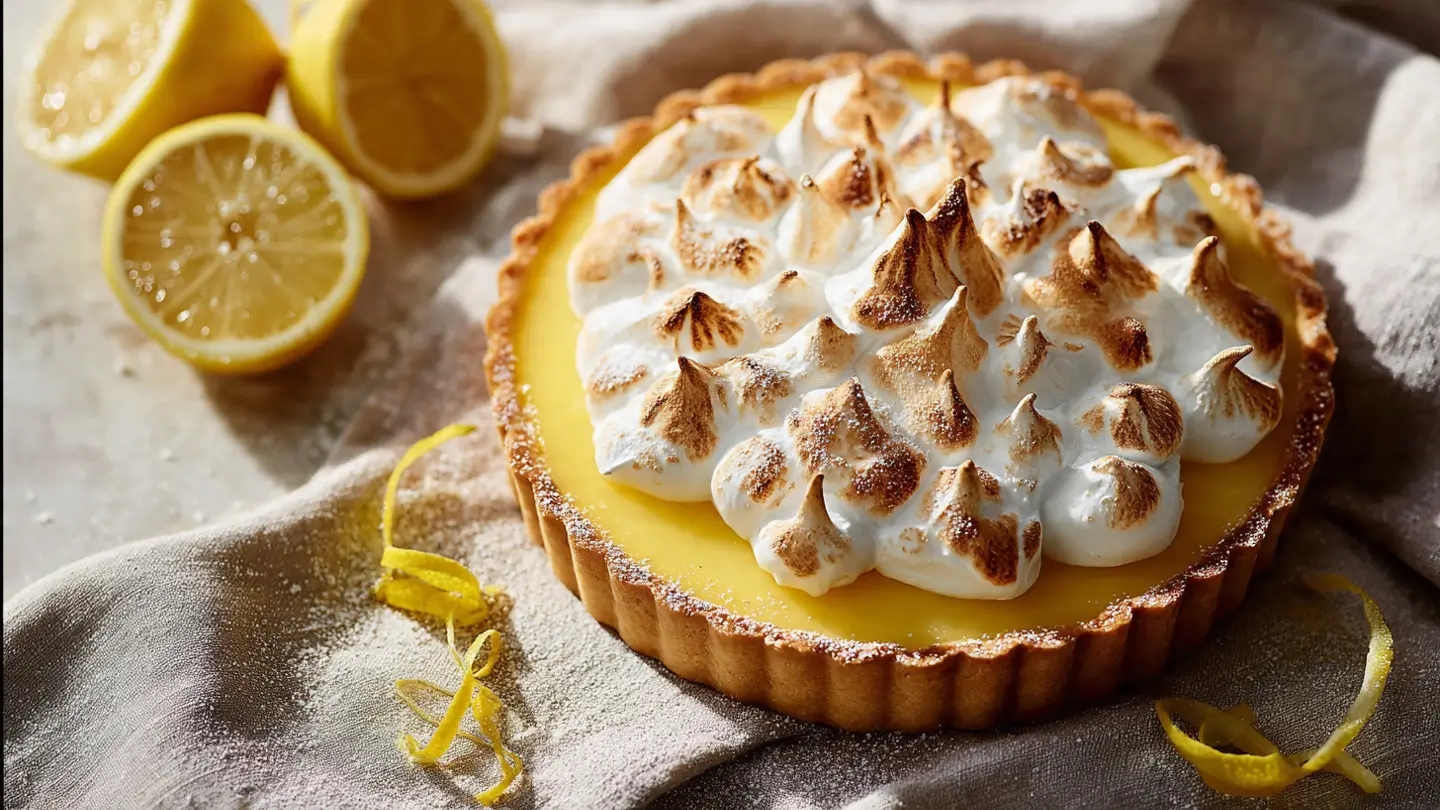
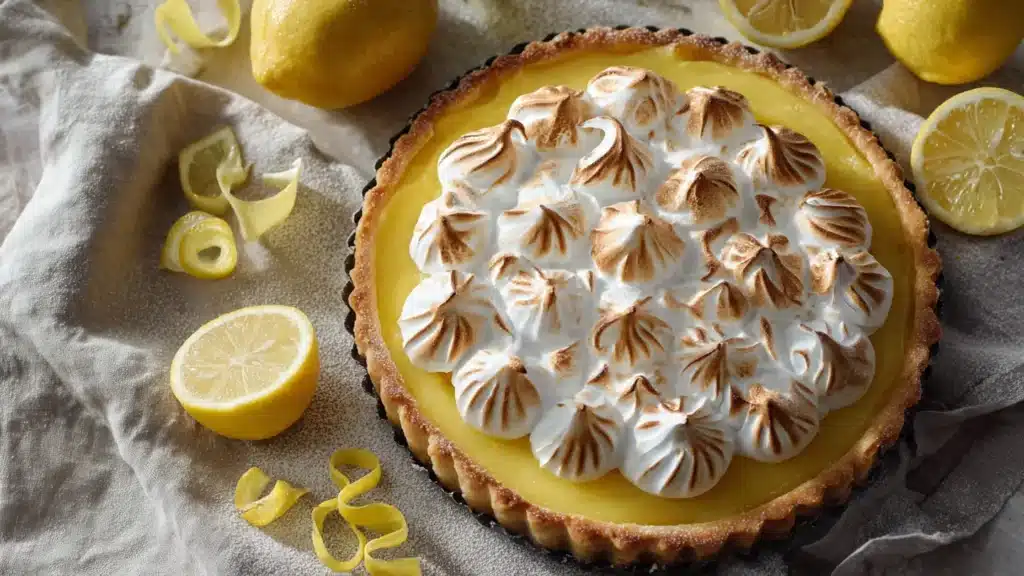
- Toasted meringue peaks for a lemon meringue pie twist.
Ingredients
- Sweet Tart Crust Pâte Sucrée
- 1¼ cups 160 g all‑purpose flour
- ¼ cup 50 g white granulated sugar (or powdered sugar for more tender crust)
- ¼ tsp salt
- ½ cup 115 g unsalted butter, very cold, cut into small cubes
- 1 large egg cold
- ½ –1 tbsp ice water only if needed to bring dough together
- Silky Lemon Curd Filling
- 4 large egg yolks
- ½ cup 100 g white sugar
- Pinch of salt
- ½ cup 120 ml fresh lemon juice (about 3–4 lemons)
- 1 tbsp finely grated lemon zest
- 4 tbsp 60 g unsalted cold butter, cut into small cubes
- 2 tbsp heavy cream optional, for extra richness
- Swiss Meringue Topping
- 3 large egg whites room temperature
- ¾ cup 150 g granulated sugar
- ¼ tsp cream of tartar
- ½ tsp vanilla extract optional
- To Finish
- Powdered sugar for dusting (optional)
- Fresh berries lemon zest, or whipped cream (optional garnish)
Instructions
- Part 1: Make the Tart Crust
- Make the Dough
- In a food processor, pulse flour, sugar, and salt together.
- Add cold butter cubes; pulse until mixture resembles coarse crumbs with pea‑sized pieces.
- Add egg; pulse until dough just starts to clump together. Add ice water a few drops at a time only if needed.
- Do not overmix.
- Chill the Dough
- Turn dough onto a lightly floured surface; press into a disc.
- Wrap in plastic wrap; refrigerate at least 1 hour (up to overnight).
- Line the Tart Pan
- Roll chilled dough into a circle about ⅛‑inch thick on a lightly floured surface.
- Gently drape over a 9‑inch (23 cm) tart pan with removable bottom; press into sides without stretching.
- Trim excess dough flush with the rim.
- Freeze lined tart pan 30 minutes before blind baking.
- Blind Bake the Crust
- Preheat oven to 375°F (190°C).
- Line frozen tart shell with parchment paper; fill with pie weights, dried beans, or uncooked rice.
- First bake: Bake 20 minutes until edges are set and firm.
- Remove parchment and weights carefully.
- Second bake: Bake 10 more minutes until bottom is dry, golden brown, and fully baked.
- Cool completely on a wire rack before filling.
- Part 2: Make the Lemon Curd Filling
- Cook the Lemon Curd
- In a heatproof bowl, whisk egg yolks, sugar, salt, fresh lemon juice, and lemon zest until combined.
- Set bowl over a saucepan of gently simmering water (double boiler); make sure bowl does not touch the water.
- Cook over low heat, whisking constantly, 8–12 minutes until mixture is thick enough to coat the back of a spoon.
- Add Butter
- Remove from heat; whisk in cold butter cubes one at a time until fully melted and incorporated.
- Add heavy cream if using; whisk until smooth.
- For an ultra‑smooth curd, strain through a fine‑mesh sieve into a clean bowl.
- Cool the Curd
- Press a sheet of plastic wrap directly onto the surface of the curd to prevent a skin forming.
- Let cool to room temperature, then refrigerate 2–3 hours until fully set and thickened.
- Fill the Tart Shell
- Pour chilled, set lemon curd into the cooled tart shell.
- Smooth the top evenly with a small offset spatula.
- Refrigerate the assembled tart at least 4 hours (overnight is even better) before adding the meringue.
- Part 3: Make the Swiss Meringue and Finish
- Make the Swiss Meringue
- In a stand mixer bowl (or heatproof bowl), combine egg whites, sugar, and cream of tartar.
- Set bowl over a saucepan of simmering water; stir frequently with a whisk until sugar is fully dissolved and mixture reaches 160–175°F (71–80°C), about 6–8 minutes.
- Transfer to stand mixer; whip on high speed with whisk attachment until glossy, stiff peaks form and bowl has cooled to warm (about 5–7 minutes).
- Add vanilla extract if using; whip 30 more seconds.
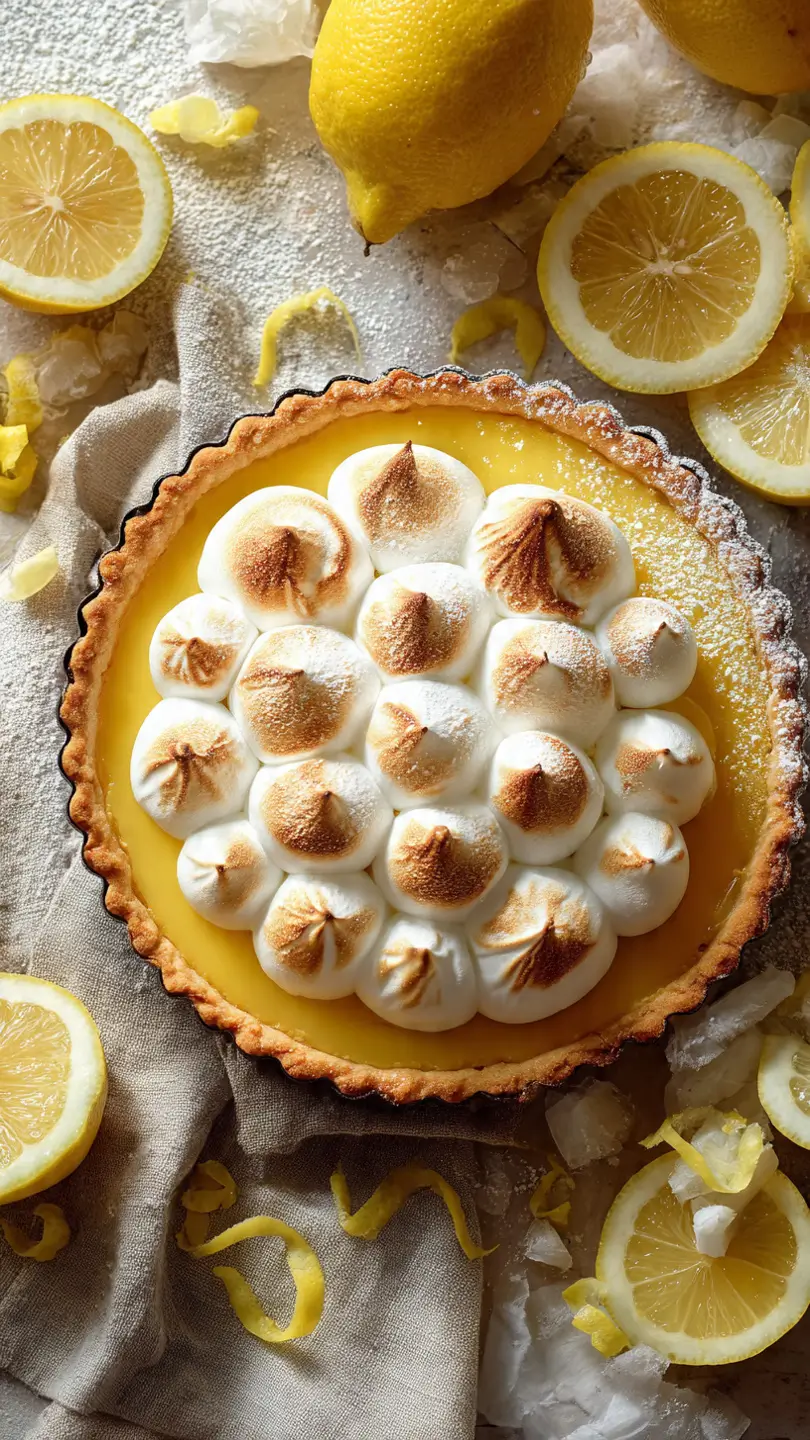
- Top the Tart with Meringue
- Remove set tart from the fridge.
- Pile meringue generously over the lemon curd filling.
- Use the back of a spoon or offset spatula to create swirls and peaks for texture.
- Toast the Meringue
- Kitchen torch (recommended): Hold torch 2–3 inches from the surface; move in circular motions until tips are golden brown and lightly charred in spots for that classic burnished finish.
- Oven broil (alternative): Place under broiler on the top rack 2–3 minutes, watching closely — it browns very fast.
- The meringue should be beautifully golden with some charred tips throughout.
- Chill and Serve
- Refrigerate at least 30 minutes after topping with meringue before serving.
- Remove tart from pan by setting it on a jar and letting the ring fall away.
- Slice with a sharp hot knife (dip in hot water, wipe clean between cuts) for clean slices.
- Garnish with powdered sugar, lemon zest, or fresh berries if desired.
Notes
Nutrition

Frequently Asked Questions
A classic French lemon tart, or lemon curd tart, features a crisp tart shell filled with a smooth, rich lemon curd. A lemon meringue tart (or pie) takes it a step further. After filling the shell with lemon curd, it’s topped with a fluffy, sweet meringue made from whipped egg whites and sugar, which is then lightly toasted to a golden brown.
Your lemon tart is perfectly baked when the tart shell is golden brown and the lemon filling is set. The center of the filling should be slightly wobbly, similar to a cheesecake, but the edges should be firm. Follow the recommended baking time, then let the tart cool completely on a wire rack to allow the filling to set fully.
Different baking times for lemon tarts depend on the oven’s temperature, tart thickness, and filling consistency. A longer bake ensures the filling sets properly without overcooking the crust. Adjusting baking time is crucial for achieving that perfect balance of a creamy center and a flaky, golden crust.